Document Actions
Examples
- Introduction
- Hello World
- Personalized Information of a layer
- Editing
- Graphic Query
- Zoom to selection
Introduction
A series of examples (with explanatory commentaries in the code) have been developed with the manual and are distributed together. We will describe them separately here briefly.
The source files for the examples, as well as the datasets, icons, etc... can be obtained from here (http)
Hello World
The first example, is the easiest one and the one we all have started at some point in the past.
The example shows how to add a menu (always visible to start with) and to show a dialog box with “Hello World”.
The files involved are:
- config.xml.- The extension helloworld is defined with its own menu.
- HelloWorldExtension.java.- The class that implements our “Hello World”.
Personalized Information of a layer
This example has been around for a while. It shows how to build a tool to query a layer for information, and to show the information as a personalized form (very easy).
It shows how to create a “tool” style button, one of those you click in the view to make a selection based on the point that was clicked. It is also useful to see how the “andami” style forms are created (inheriting from a Jpanel and using PluginServices).
The files involved are:
- config.xml.- The extension is defined with the button and the corresponding toolbar.
- MyInfoExtension.java.- The class that creates and assign the tool listener.
- tools/MyInfoListener.java.- inherits from InfoListener and over the point() method searches for the polygon over which the user has clicked and creates the dialog box to show the information (DlgProvin).
- gui/DlgProvin.java. A simple panel, with a label and a text box that shows the value of the field of the layer over which we have clicked.
- The extension searches for a layer called “Provin.shp” that is included in the data directory. It needs to be added to the view for the tests.
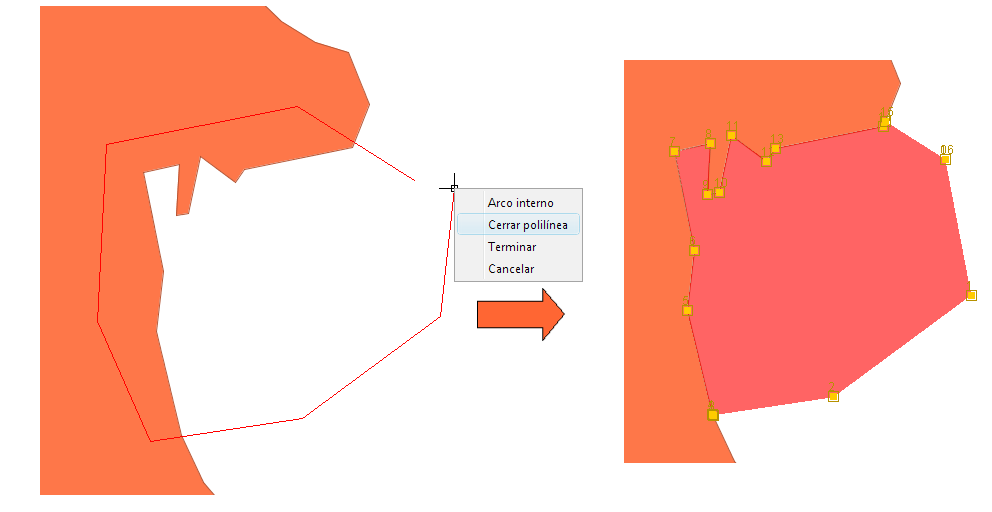
Editing
In this example it is shown how to use a tool already built in another pluggin (extCAD) to inherit from its behaviour and to modify or expand it. In short, it has been implemented a polygon autocompletion feature. The user can draw a polygon and if he/she does it over another existing polygon, the tool takes it into account to follow the boundary between the two plolygons.
The files involved are:
- config.xml.- The extension is defined with the corresponding button and toolbar.
- MyInfoExtension.java.- The class that creates and assigns the tool listener.
- tools/AutoCompletePolygon.java
Graphic Query
This is a typical example of selection by rectangle. It is based on the code of RectangleSelectionListener, and it shows how to work with the selection thru the FBitSet object.
- config.xml.- The extension is defined with the button inside the toolbar workshop.
- SelectExtension.java.- The class that creates and assign the tool listener.
- tools/MySelectRectListener.java
Zoom to selection
Related to the previous example. Once we have a selection, we could analyse it and run any kind of processing over it.
- config.xml.- The extension is defined with the button within the toolbar workshop.
- SelectExtension.java.- Within the class it is discriminated in base of the action-command and the zoom code it is executed.
In the workshop, the ant script that is compiled by the pluggin is build.xml, and in addition to create the .jar, it copies the image directory, the potential libraries owned by the pluggin and the configuration and translation files. It is worthwhile to take a look at it, because it can be used for your own pluggins with little modification (usually variables at the beginning).


