Document Actions
Description
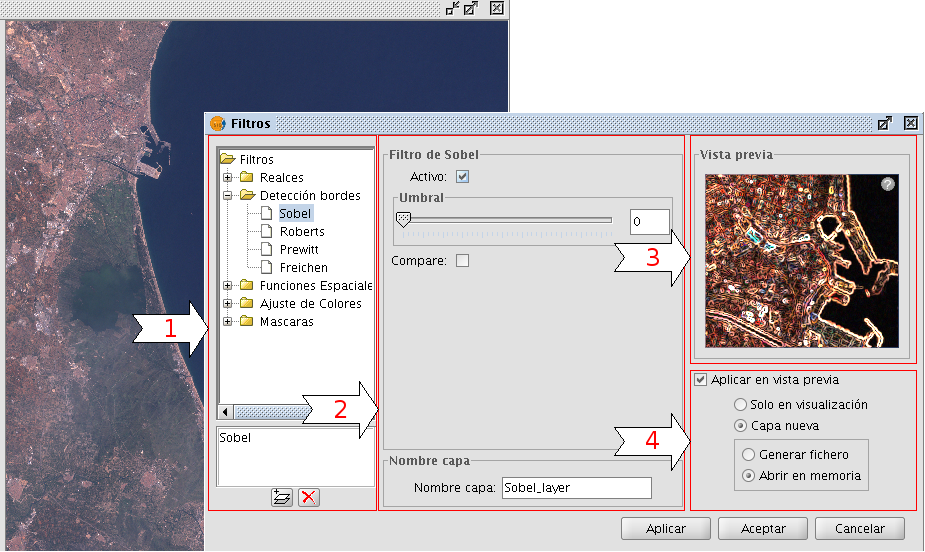
Description of the Filter dialog
Filtering is a process by which we can enhance images. gvSIG can filter images through a variety of filtering methods. In the upper left part of the Filter dialog, the filters are grouped by type (1). By double-clicking one of the filters or by clicking on the "Add Filter" button on the bottom left, the filter will be added to the list of filters in the lower left part of the Filter dialog. All filters in the filter list will be applied in the preview. If you want to remove a filter from the list, you can either double-click on the filter or click on the "Delete filter" button. The filters in the list will be applied to the image in the order that they appear. Keep in mind that the order in which the filters are applied will affect the result, and changing the order of the filters may change the output.
In the middle of the dialog window are the controls of the selected filter (2). When changing the controls of one of the filters from the filter list, the results will be directly shown in the preview window. Below the middle part of the dialog you can change the name of the output layer that will be generated when clicking "Apply" or "Close".
On the right side of the dialog you can preview the outcome of the filters (3). (See documentation on "Preview tool"). In the lower right part you can select whether you want to display the filters over the selected layer or save the filtered image as a new layer (4).
The button "Apply" will apply the changes according to the entered parameters, keeping the Filter dialog open. The "Close" button will apply the changes and close the Filter dialog. The "Cancel" button will close the Filter dialog without applying any filters.
All filters in the filter list can be activated or de-activated through the "Active" checkbox. This checkbox is usually located in the upper part of the filter control panel.
Configuration panel for the image filters
Generate a new layer or apply to current layer
The number of applied filters will affect the time that it will take to draw the layer. If you choose to apply the filters to the current layer, the drawing and re-drawing of the layer may slow down while the filters are applied. If the filter results are saved as a new layer, the filtering process has to be done only once so that the next time the layer is drawn, it will not be slowed down by the filtering. Therefore, it is generally recommended to save the output to a new layer if possible. There are cases though in which it is not recommended to generate a new layer. For example, if you have a large orthophoto and you only want to change the brightness a little, it could take more time to save the output as a new layer. If the brightness filter is applied over the current view, the area on which the filter is applied is much smaller which makes the drawing faster. It is up to the user to decide whether it is better to create a new layer or display the filters on the view of the current layer.


