Document Actions
GVSIG
Introduction
In this chapter we will see how the gvSIG application is organized internally. We will start with the main body (appgvSIG) and we will see how its functionality has been extended based on extensions.
In fact, appgvSIG is in itself another of Andami's plugging, containing the extensions that defines the basic functionalities of gvSIG.
gvSIG is internally organized similarly as it is organized externally. That is, there are classes controlling the gvSIG project and the project is composed at the same time by various types of documents (Views, Maps, and Tables) although they can be extended by other types of documents.
The packages are organized according to this structure:
NOTE: The structure could seem somehow arbitrary (in fact, it is :-(). But it is the one available, and we will try to describe a little the packages. In the future they shall be re-organized.
- The classes implementing IExtension are in the root package: com.iver.cit.gvsig. This is something that has been followed by the developers and it seems to be a sound practice. This way it is easier to find which are the entry points for the options in the menus, buttons, etc.
- The package com.iver.cig.gvsig.project is a good entry point to get acquainted with gvSIG. In theory, gvSIG follows a structure which is influenced by the organization by documents within a project. The most important classes here are Project.java and ProjectFactory.java. The first one represents the gvSIG project and the static method createFromXML() is the entry point to see how to read a .gvp file (gvSIG project). The contrary step, create a .gvp file is done with the writeProject method of the ProjectExtension extension and it calls the getXMLEntity() method from the Project class.
- Within the project package is the com.iver.cit.gvsig.project.documents package. We will find there the ProjectDocument and ProjectDocumentFactory classes. The first one is the class from which the rest of the documents inherit (can be selected and use the F4 key). The second is the one responsible for creating the documents and manage the potential documents that in the future could expand the model of objects, for example with 3D views.
In the rest of the packages we will find the classes related with the layout, view and table. Within contextMenu the context menus and in the other packages some exceptions and the user interface classes to add layers (GUI)
The rest of the packages do not follow a set logic or at least it is not apparent. Surely they will be reorganized in the future. However, in case you ever need to look for code, it is possible you could be interested to look at com.iver.cit.gvsig.gui.layout. Within this you will find the Layout class, responsible for the maps prepared for printing and the classes within the fframes package, were you could see all that can be added to a layout (views, legends, north arrows, text, graphics, scale, etc). This area is waiting for a rebuild that will allow for easy expansions from external plugging’s.
An interesting class to begin to explore when you are working at this project level is the com.iver.cit.gvsig.ProjectExtension class. This is the entry point to the operations of creating a new project, loading an existing one, save it, etc.
Once introduced (although briefly and superficially) the packages structure, let us take a closer look at the principal parts of gvSIG. Or at least those you would work most likely.
Views
Introduction
The default view in gvSIG (the one everyone is used to see) basically contains a MapControl object (where the layers are drawn), a MapOverview object (the locator which inherits from MapControl) and a table of contents (ToC) where the user can see the available layers, their drawing order, etc.
In the 3D pilot there it has been created a new type of view (3D) and in doing so it has been implemented a mechanism so different types of vista can be defined.
View
Introduction
A view relates to the project through the class com.iver.cit.gvsig.project.documents.ProjectView. The object com.iver.cit.gvsig.project.documents.view.gui.View is created with the method createWindow() and the model is assigned to it. The model is the ProjectView document that has a MapContext associated to the MapControl and another MapContext that corresponds with the layers of MapOverview. The ToC is in reality another way to view the MapContext associated to the MapControl.
View has also a console that is used when a layer in being edited, so the user can key in the editing commands as in a CAD software.
MapControl
In many extensions the first thing is to obtain the object View and from that to obtain the associated MapControl and MapContext. This is usually the entry point. With the MapContext we have already the list of layers (Flayers), search tool for the layer that we would like to work with, etc. Let’s take a look at an example:
com.iver.andami.ui.mdiManager.IWindow view = PluginServices.getMDIManager().getActiveWindow();
if (!(view instanceof View))
    return;
View vista=(View)view;
IProjectView model = vista.getModel();
MapContext mapa = model.getMapContext();
MapControl mapCtrl = vista.getMapControl();
logger.debug("Comand : " + s);

if (s.equals("FULL") ) {
    try {
        // mapa.beginAtomicEvent();
        mapa.getViewPort().setExtent(mapa.getLayers().getFullExtent());
        mapa.clearAllCachingImageDrawnLayers();
        vista.repaintMap();
        // mapa.endAtomicEvent();
    } catch (DriverException e) {
        NotificationManager.addError("Error getting full extent",
            e);
    }
}
This portion of code comes from the com.iver.cit.gvsig.ViewControls class. It uses PluginServices.getActiveWindow() to obtain the active window. If that window is of type View, then it gets the MapContext to show a zoom of all the layers:
mapa.getViewPort().setExtent(mapa.getLayers().getFullExtent());
The most interesting classes to review to see examples of this type are:
- ViewControls.- They are many commands in only one class: full extent, panning, configure locator map, zoom in, zoom out, meassure, set layers as visible, not visible, active, not active, save to raster, change scale...
- ViewSelectionControls.- Select by point, by rectangle, by polygon, by layer and invert selection.
- Export.- Exports to raster what is visible in a view.
- AddLayer.- It is used for adding layers to a view. It is far more complex of what it looks like, since it shows a dialog box extensible from external pluggings. In fact, it is used by other pluggings to add layers based on spatial databases, WMS, WFS, etc. In this class there is only the necessary to add layers based on files (.shp, raster, .dxf, .dgn, etc). It is also important that you pay attention to the projection treatment associated to the layer and the view. If they do not coincide, it will try to reproject on the fly.
- InfoToolExtension.- The window to show information is far more complex of what it looks like (perhaps far more than necessary). This class is only the entry point to find out its functioning.
Within the views it is very interesting to see the relationship between the MapOverview and the MapControl. We will see it next.
MapOverview
A MapOverview is a subclass of the MapControl, with the particularity that is linked to the MapControl within the View document. By default it is on the lower left corner, and it allows for any kind of layer to be loaded onto it and for the management of its legend. It is usually used as a locator, showing some location layers and a rectangle that shows the visible rectangle of the associated MapControl.
The MapOverview is a listener of the MapControl, so that any change in the visualisation of an area makes the MapOverview to update and show the corresponding area shown by the MapControl.
The code responsible of this behaviour is:
public void setModel(MapContext model) {
    this.setMapContext(model);
    model.setProjection(m_MapAssoc.getMapContext().getProjection());
    m_MapAssoc.getMapContext().getViewPort().addViewPortListener(this);
    getMapContext().getViewPort().addViewPortListener(this);
}
On having associated the MapOverview model, this is added as a listener to the viewPort of the main MapControl.
public void extentChanged(ExtentEvent evExtent) {
    // We get the new extent of the associated FMap, so we draw our
    // rectangle to show the drawing area of the other map.
    repaint();
}

protected void paintComponent(Graphics g) {
    super.paintComponent(g);
        if ((m_MapAssoc.getMapContext().getViewPort().getExtent() != null) &&
                (getMapContext().getViewPort().getExtent() != null)) {
            if (first) {
                first = false;
                repaint();
                return;
            }
            image = new BufferedImage(this.getWidth(), this.getHeight(),
                        BufferedImage.TYPE_INT_ARGB);
            ViewPort vp = getMapContext().getViewPort();
            Rectangle2D extentView=vp.getAdjustedExtent();
            ViewPort vpOrig = m_MapAssoc.getMapContext().getViewPort();
            if (extent==null)
                extent=vpOrig.getAdjustedExtent();
            // We draw the extent of the associated map.
            Graphics2D g2 = (Graphics2D) image.getGraphics();
            g2.setTransform(vp.getAffineTransform());

            g2.setStroke(new BasicStroke((float) vp.getDist1pixel()));

            g2.setColor(Color.red);
            g2.draw(extent);
            g2.setColor(new Color(100,100,100,100));
            g2.fill(extent);
            // We draw the vertical and horizontal lines.
            Point2D pRightUp = vp.toMapPoint(getWidth(), 0);

            Line2D.Double linVert = new Line2D.Double(extent.getCenterX(),
                    extentView.getMinY(), extent.getCenterX(),
                    pRightUp.getY());
            Line2D.Double linHoriz = new Line2D.Double(extentView.getMinX(),
                    extent.getCenterY(), pRightUp.getX(),
                    extent.getCenterY());

            g2.setColor(Color.darkGray);
            g2.draw(linVert);
            g2.draw(linHoriz);
            g.drawImage(image,0,0,this);
            g2.setTransform(new AffineTransform());
            extent=null;
        }

}
MapOverview implements the ViewPortListener interface:
/**
 * <p>Defines the interface for an object that listens to changes in a view port.</p>
*/
public interface ViewPortListener {
    /**
     * <p>Called when the <i>extent</i> of the view port has changed.</p>
     *
     * @param e an extend event object
     */
    void extentChanged(ExtentEvent e);

    /**
     * <p>Called when the background color of the view port has changed.</p>
     *
     * @param e a color event object
     */
    void backColorChanged(ColorEvent e);

    /**
     * <p>Called when the projection of the view port has changed.</p>
     *
     * @param e a projection event object
     */
    void projectionChanged(ProjectionEvent e);
}
So that it can respond to changes of the extent of the main MapControl.
Table of content (T.O.C.)
The ToC could be considered as another way to show the user the MapContext. In the ToC we can see the collection of layers that are contained by the MapContext and that are drawn over the View MapControl. The layers located below in the ToC are the first ones to be drawn and those at the top are the last ones to draw.
Other information shown by the ToC:
- Tree structure of the layers (those that are grouped and how).
- The type of layer (Vectorial, Raster)
- If it is visible or not.
- If it is active or not. (The active layers are highlighted. This is used for processes involving only active layers, e.g., to make a selection).
- The legend applied to each layer (symbols, colors, etc).
- Other type of information (if there it has been an error with a layer or if there is a process running in the background, etc).
Most of the time, we will not need to modify the ToC behavior, except to create and/or disable the contextual menu options (those that show up when we right-click with the mouse over a particular layer or group of layers). Because of it, we will look at how the mechanism to create these menu options work first.
Example: Add contextual menu that zoom in the layer over which we click.
Firstly to do is to register an extension point for the contextual menu. This is necessary so all the contextual menus show together.
ExtensionPoints extensionPoints = ExtensionPointsSingleton.getInstance();
extensionPoints.add("View_TocActions","ZoomAlTema",new ZoomAlTemaTocMenuEntry());
The ExtensionPointsSingleton class is a record (inherits of TreeMap) where we can register classes so they can be created by the framework when needed. The idea in this case is to give an entry list of the contextual menu and of the classes that inherits the AbstractContextMenuAction. This abstract class has functions to obtain the layer over which we have clicked (if it is a layer), the MapContext associate to the ToC (useful to refresh the map, for example), to know if have click over a “leaf” or a “branch” (isTocItemBranch, isTocItemLeaf) in the ToC tree…
In our case, the class we have created is ZoomAlTemaTocMenuEntry, in the package com.iver.cit.gvsig.project.documents.view.toc.actions.
The code that executes upon selecting this option is:
public void execute(ITocItem item, FLayer[] selectedItems) {
    if (selectedItems.length==1) {
        try {
            if (!selectedItems[0].isAvailable()) return;
                    getMapContext().zoomToExtent(selectedItems[0].getFullExtent());
        } catch (com.iver.cit.gvsig.fmap.DriverException e1) {
            e1.printStackTrace();
        }
    } else {
        try {
            Rectangle2D maxExtent = setMaxExtent(selectedItems);
            getMapContext().zoomToExtent(maxExtent);
        } catch (com.iver.cit.gvsig.fmap.DriverException e1) {
            e1.printStackTrace();
        }
    }
}
The method execute() gets as parameters the ToC item over which we had clicked and the list of selected layers. In any case, the method more useful is getMapContext(), since it gives access to the real model of what we are looking at in the view (Layers + ViewPort).
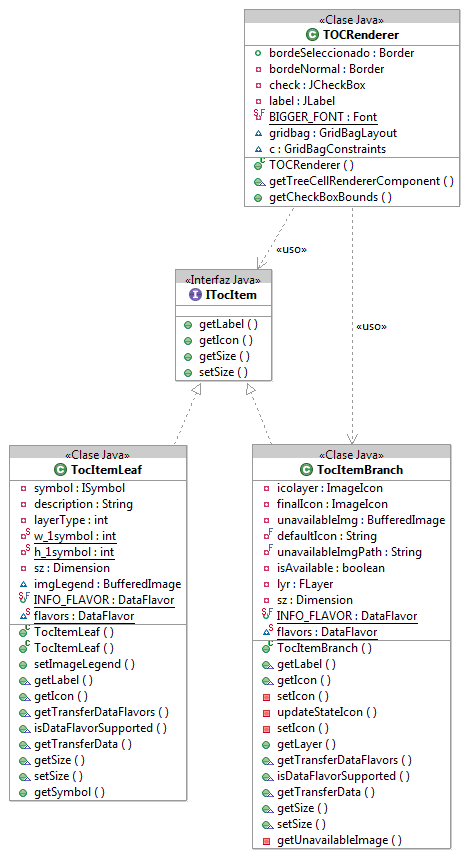
The TOC class (com.iver.cit.gvsig.project.documents.view.toc.gui) is a panel containing the tree of layers and the main component inherits from a JTree => DnDJTree (it is added a support for drag and release, among other things).
The items representing the layers follow a Composite pattern, where the branches represent the layers and the groups of layers and the leaves represent the symbols with their corresponding descriptions. Visually they are an icon + a label.
Tables
Tables in gvSIG are of two types: those showing the alphanumeric data associated to a layer in a View and those that are added to the project as standalone tables with supported formats or coming from any database with supported connexion by gvSIG (ODBC, memory process, etc).
The table of the layer is related to that layer and it has a series of properties and associated event listeners to allow behaviours such as that selecting on the layer is reflected on the table and vice versa. They have been added to the project by the “Show attributes of selected layer” button that is in the View and that becomes enabled when there is an active layer.
The class representing the document Table is ProjectTable. It is basically a bundle around an object IEditableSource that is where the real data is taken from (values of rows). The rest of the properties are used to manage the layers associated to that table, the visible fields, the aliases of those fields, etc.
Usually we will work with the model IEditableSource that is under, if we want to work with the raw data.
If we need to add functionalities to the table window, than we will have to look at the com.iver.cit.gvsig.project.documents.table.gui.Table class. This class is the one implementing the visible part of the Table document. It is very complex and probably subject to change in the gvSIG version 2.0, thus we are not going to go too deep, just a little over it.
- It has a series of associated listeners to answer to the mouse and keyboard events (TableKeyListener, MouseRow, MouseHandler).
- It also answer to the selection events (TableSelectionListener).
- There are methods for editing (columns, rows, cells) that are very related to the internal model of the table (accessible through getModel().getModelo() => getModel() it returns the associated Project Table and ProjectTable.getModelo() returns the IeditableSource interface).
Up to the date the classes implementing IEditableSource are EditableAdapter and VectorialEditableAdapter, which keep the changes in memory until the end of the editing session and all data is saved. This system presents some inconveniency and because of that, it is likely to be changed in version 2.0, so we will not go into much detail about it.
Maps
The last document we will see is Maps or Layouts.
This is the one used for creating printouts and even though it is one of the most useful components (and sometimes complex) of gvSIG, it is very easy to explain.
The Layout object (com.iver.cit.gvsig.gui.layout.Layout) is basically a canvas over which a hierarchic structure of FFrames is painted.
FFrames is an abstract class representing something that can be added to the Layout. It has defined limits (a rectangle) and each class inheriting from FFrame is responsible for drawing within that rectangle. This way the door is left open for the type of elements that can be added to a Layout
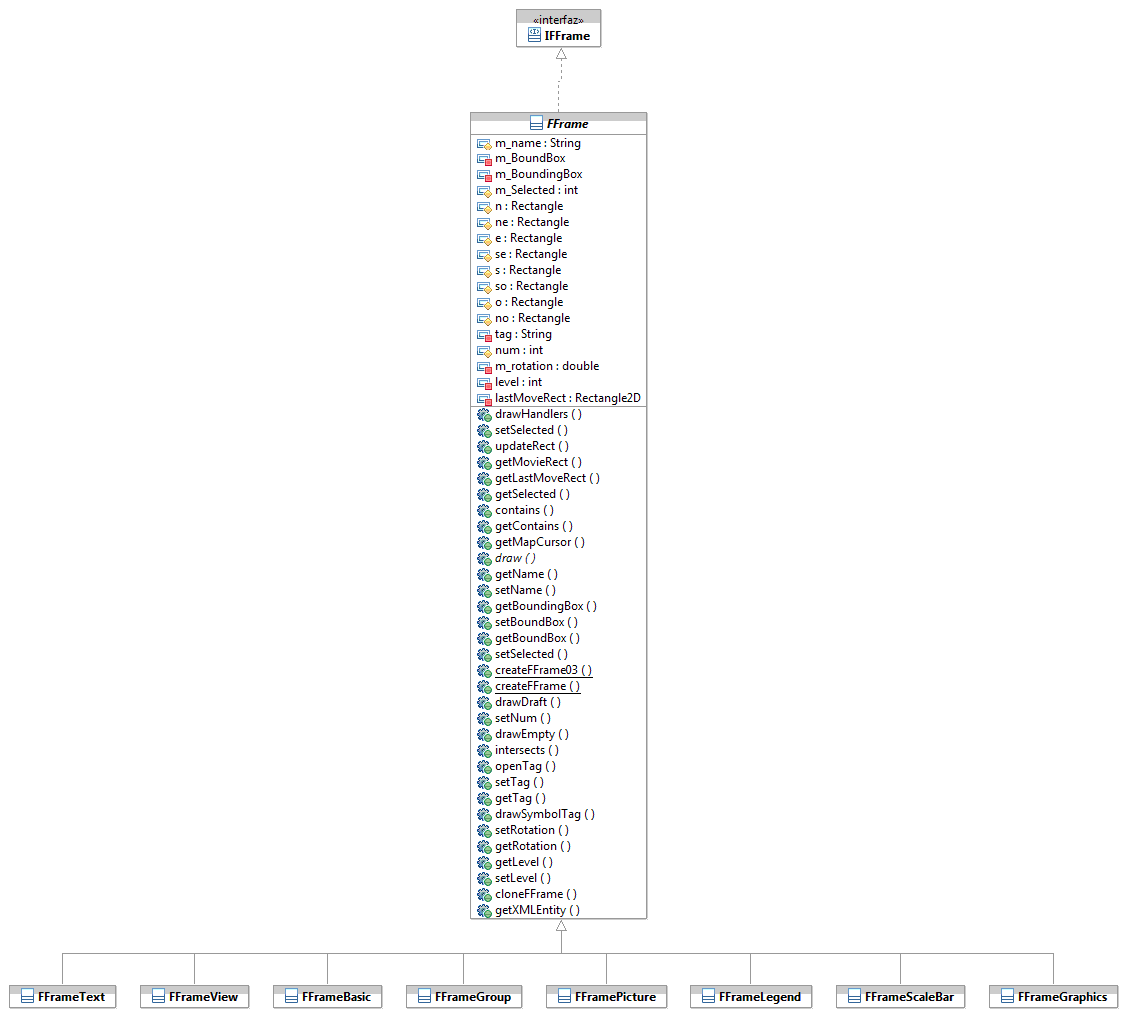
To see the entire hierarchy we can open the IFFrame interface (within the project.documents.fframes package)and select F4. We will find there all that can be added to the Layout:
- FFrameView: It is the most complex. It represents a View. There are few properties that can be defiend. (see user’s manual) such as if it is linked (or not) with the view that generated the object, the desired printing scale, etc. It also supports the functionality to change the zoom and the scale using tools from within the layout (very useful to frame correctly before printing).
- FFrameScaleBar: A scale bar (usually link to a FFrameView) with lots of customization options.
- FFrameLegend: The map legend, with the layers and their symbology. It can also be customized, to indicate which layers can be visible or invisible.
- FFramePicture: To add images.
- FFrameNorth: A particular case of FFramePicture to add north symbols (usually based on a SVG files and rendered by the Batik library).
- FFrameGraphics: Represents the vector elements available to be added to a map, such as boxes, break lines, circles, curves, etc.
- FFrameText: Text with support for font, colour, size.
All these graphic elements (and the ones to come) can be modified and the user can interact with them through dialog boxes available in the com.iver.cit.gvsig.project.documents.layout.fframes.gui.dialogs package.
Normally, it will not be necessary to touch any of these, but it is possible that during the creation of automated cards or series of layouts using code, we may have to retouch some of these elements (the typical thing is to change the FFrameView extent).
This is an example of code that iterates for the FFrame:
IWindow w= PluginServices.getMDIManager().getActiveWindow();
if (w== null) {
    return false;
}
if (w instanceof Layout) {
    Layout layout = (Layout) w;
            IFFrame[] fframes=layout.getFFrames();
    for (int i = 0; i < fframes.length; i++) {
                IFFrame f = fframes[i];
        if ((f.getTag() != null) && (layout.showIconTag())) {
                        f.drawSymbolTag(g2);
                    }
            }
 }
getTag() makes reference to a tag that can be added to all the instances of a FFrame. Its purpose is to be able to identify within a plan those FFrame that we would like to work with, for example, we can mark the fields of a form with the table and field that we could use to substitute the text in each printing of a series of cards.


