Document Actions
It is all about extensions
Introduction
The first thing we will look at is how gvSIG is organized internally.
One of the requirements for gvSIG was to be modular, that is, it should allowed for functionality improvements without having to modify the original code.
That is the reason we start from a nearly empty application that basically give us a windows manager and a load of plugins based on configuration files. The idea is exactly the same as the one used by Eclipse. Our plugings are the equivalent to the bundles from Eclipse, and Andami (our framework) is the equivalent of the RCP from Eclipse.
In a gvSIG installation, the andami.jar contains the base application, and the class that is executed is Launcher.java. Then we find the “extensions” directory, and inside that directory there are as many subdirectories as plugins installed in Andami.
Those subdirectories have the following structure:
A file config.xml where all the dependencies for that plugin are specified, the menus, toolbars and buttons that are available for the application and the implemented classes defined by the functionalities of the plugin.
A file .jar with the classes that make up the plugin (it can be with the file config.xml, or in some directory, e.g. lib).
Other libraries used by the plugin will be next to the .jar file mentioned before, usually in lib.
Other files used by the plugin (button icons and/or any other file to be used by that plugin.
The format for the config.xml file can be found in _fwAndami/schemas/plugin-config.xsd. Open the file with a text editor and read the comments. For example:
<!--
action-tool => Button which fires the execution of this extension

action-command Text to identify different action-tools inside a plugin
text Button's text.
name Button name (to retrive it)
icon Tool icon
last If true, a separator is added.
tooltip Tooltip
enable-text Text that describes the necessary conditions to enable a tool
position The position inside the toolbar
-->
<xs:element name="action-tool">
<xs:complexType>
<xs:attribute name="text" type="xs:string" use="optional" />
<xs:attribute name="name" type="xs:string" use="optional" />
<xs:attribute name="action-command" type="xs:string" use="optional" />
<xs:attribute name="icon" type="xs:string" use="required" />
<xs:attribute name="last" type="xs:boolean" use="optional" />
<xs:attribute name="tooltip" type="xs:string" use="optional" />
<xs:attribute name="enable-text" type="xs:string" use="optional" />
<xs:attribute name="position" type="xs:int" use="optional" />
</xs:complexType>
</xs:element>
Here it is defined how to specify a button “action-tool” type. An example of usage:
<extension class-name="com.iver.cit.gvsig.AddLayer"
description="Extension to open different layers."
active="true"
priority="20">
<menu text="View/Add_Layer" key="o" icon="images/addlayer.png"/>
<tool-bar name="View" position="2">
<action-tool icon="images/addlayer.png" tooltip="Add_Layer" position="1"/>
</tool-bar>
</extension>
We will see that the class containing the code to be executed when we click on the addlayer button it is called com.iver.cit.gvsig.AddLayer.java.
The toolbar containing that button is called “View”, and the button defines its icon (addlayer.png, inside the images directory), its position within the toolbar (it will be the first button) and the tooltip. The chain Add_Layer can be found in the .properties files. It is the code used for translating the text to the corresponding language. The remainder of the parameters are optional, thus they have not been defined.
The most important of all is that the config.xml file of an extension provides an excellent guide to understand what code we need to look at in order to know what a button or a menu option will do exactly when executes. The parameter class-name for the extension is the key, the class to look up and that will help us for copying its code whenever we want to create an extension similar to one that already exist.
Now we know how gvSIG is organised internally. The next step is to know how all the directories are generated, how the extensions are compiled, which extensions we can work with and what parameters gvSIG needs for star up. We will cover all those points next.
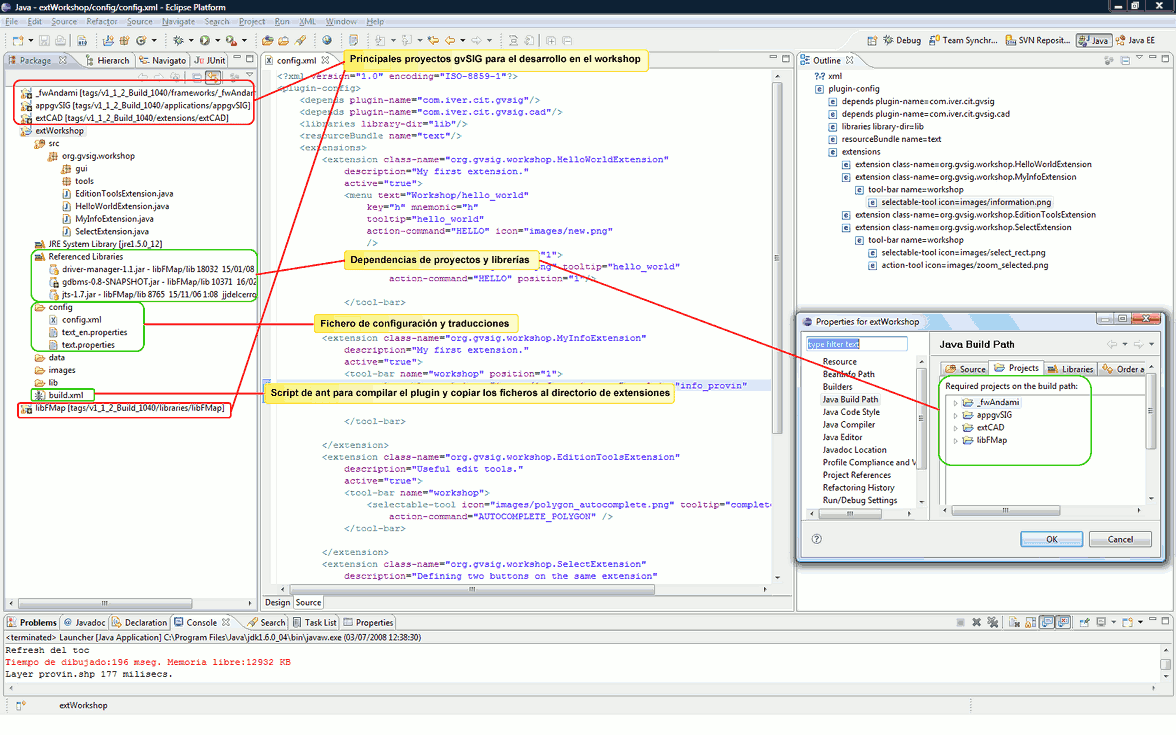
To compile a project
The following figure shows gvSIG version 1.1 open in Eclipse.
No reason to get over overwhelmed by the amount of projects (well, just a little bit...;-)). The first thing is to work with those that are indispensable. Later, if required we could modify or look at the code of the rest of the pluggings by opening and compiling those that we need.
VERY IMPORTANT: To execute the first compilation, follow the instructions from the Readme.txt file. In each distribution the method and/or the arguments could change some, but usually they are similar.
Basically there are 2 methods, one semiautomatic that compiles all the projects and another one "manual" that consists in finding the build.xml files of each project and execute them as ant targets. It is important to follow the established order in order to avoid problems.
Once the projects are compiled, we can start to work.
The best is to work only with those projects we are going to need. Close all the extension's projects you are not interested in, and leave open at least these ones:
- _fwAndami
- libCorePlugin
- libFMap
- appgvSIG
If you are interested in the editing functionalities, you should leave open the extCAD. If you would like to work with spatial database, leave open extJDBC. If your thing is raster, you will probably need libCq CMS for java and extRasterTools.
To start with, leave also an example project: extNewDocumentExample. It will help us as a starting point for our first pluggin.
Each project has a build.xml file that is executed as an ant target (mouse right click, run as... | ant tool.
In the build.xml file we define the name for our plugging, as well as the libraries and files that are needed to function. For example:
<project name="exaWorkshop" default="generate-without-source" basedir=".">
<description>
Examples for workshop on III Jornadas gvSIG
</description>
<!-- set global properties for this build -->
<property name="src" location="src"/>
<property name="build" location="bin"/>
<property name="dist" location="dist"/>
<property name="mainplugin" value="com.iver.cit.gvsig"/>
<property name="plugin" value="org.gvsig.workshop"/>
<property name="gvsiglibjar" value="org.gvsig.workshop"/>
<property name="andami" location="../_fwAndami" />
<property name="extensionsDir" location="../_fwAndami/gvSIG/extensiones"/>
<property name="lib-dir" location="${extensionsDir}/${mainplugin}/lib"/>

<target name="init">
<!-- Create the time stamp -->
<tstamp/>
<!-- Create the build directory structure used by compile -->
<mkdir dir="${build}"/>
<mkdir dir="${dist}"/>

</target>

<target name="generate-without-source"
description="generate the distribution without the source file">
<!-- Create the distribution directory -->
<mkdir dir="${dist}"/>

<!-- Put everything in ${build} into the MyProject-${DSTAMP}.jar file -->
<jar jarfile="${dist}/${plugin}.jar" basedir="${build}" includes="org/gvsig/workshop/**"
/>
<copy todir="${dist}/images">
<fileset dir="images" includes="*"/>
</copy>
<copy file="config/config.xml" todir="${dist}"/>
<copy todir="${dist}">
<fileset dir="config" includes="text*.properties"/>
</copy>
<move todir="${extensionsDir}/${plugin}/">
<fileset dir="${dist}" includes="**/**"/>
</move>
</target>


<target name="compile" description="compile the source" >
<!-- Compile the Java code from ${src} to ${build} -->
<mkdir dir="${build}" />
<echo>${compile-classpath}</echo>
<javac srcdir="${src}"
destdir="${build}"
debug="${debug}"
debuglevel="${debuglevel}"
classpath="${compile-classpath}"/>
</target>

<target name="copy-data-files">
<copy file="config/config.xml" todir="${dist}"/>
<copy todir="${dist}">
<fileset dir="config" includes="text*.properties"/>
</copy>
</target>

<target name="move-to-andami">
<move todir="${extensionsDir}/${plugin}/">
<fileset dir="${dist}" includes="**/**"/>
</move>
</target>


<target name="clean"
description="clean up" >
<!-- Delete the ${build} and ${dist} directory trees -->
<delete dir="${dist}"/>
<delete dir="${build}"/>
</target>
</project>
Inside the file will be defined the directories that are going to be used and where the results of the compilation will be saved. The most important variables are:
- ${extensionsDir} => The directory where we will copy everything.
- ${plugin} => The name of the plugging.
In the file you could see the targets defining it: to initialize, to erase the temp folder, to copy the files with the button icons, the config.xml file, etc.
The bold text is what you usually will need to change (the name of your pluggin and the classes your are including in the .jar, basically.
The easiest way to start a new gvSIG plugging is to copy this example, verify it compiles and works and then make the necessary changes to the package's name, the config.xml and the build.xml files. Then, the best thing is to look if there is any functionality already implemented within gvSIG that it is similar to the one we would like to implement. Probably that would be the case (click in the map, query a layer and display a form with the selected data, add a layer by code, add a table, open a project, zoom to selected, ...).
Once the common behaviors of our pluggins are identified, it is time to investigate which extensions within gvSIG can perform those tasks. We will see this with more calm later on, in the appgvSIG description, but for now it is enough to know that the starting point for our search is the config.xml, where we will find the menu or button and the class that gets executed upon selection of the option that we would like to use as a model.


