


Document Actions
2.0.0
- Overview
- The geometry model
- Geometry API access
- Create a new manager
- Geometries
- Operations
- Project Site (documentación generada con maven)
Overview
This document describes the gvSIG's geometry model in version 2. It's consequency of the last model evolution (used until version 1.9). The new model tries to approach to the ISO19107 called "Geometry data model and topology", trying to be compatible with the existing code.
Moreover of some changes in the architecture, there're some changes in several classes to be similar with the ISO's specification names and the API is separated of the implementation. All the examples of this document (apart from the examples in which an object is registered) use the library's API.
The new gvSIG's geometry model introduces the following characteristics:
- Is independent of gvSIG: the previous geometry model had dependencies with the 2D draw. It means that we couldn't have an "independent" geometry system. In the new geometry model doesn't exist any dependency with another gvSIG component.
- Is extensible: the library offers mechanisms to the user to register his own geometries and to use them on gvSIG.
In the next section, we will introduce the new geometry model and we will show some class' diagrams to get a general idea of the model. In the next sections, we will show on detail the API with examples of all the operations that we can do with the geometries.
The geometry model
General model structure
The new geometry model has two important characteristics:
- It's developed from the old gvSIG's geometry model, trying to do the lowest impact on the developed code.
- We try to approach to the ISO19107 model.
To understand the new model you must know this two characteristics because, besides we try to have a model similar to the ISO19107 model, in some cases it wasn't possible to do it and we had to do some contradictions of what the ISO's model says to keep the compatibility with the written code.
The next figure shows the main hierarchy of the new geometry model:
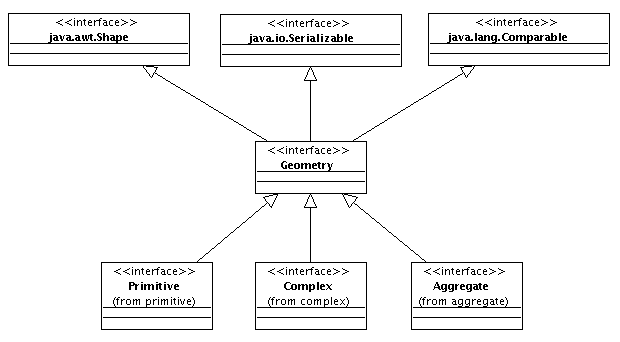
In this figure, we can see the Geometry class and all the inherit classes of it. The depency with java.awt.Shape is kept for backward compatibility reasons, but it's possible that in future versions it disappears.
Exists three main geometry types:
- Primitives (inherited from Primitive): It's the most basic geometry type. Points, lines and polygons are examples of primitive geometries.
- Complex (inherited from Complex): It must have a similar behavior with the primitive geometries (all of them have the same interface), but are built with the union of several polygons, a polygon with filled polygons, a curve composed with several curves...
- Aggregate (inherited from Aggregate): They are composed from the union of several primitive or complex geometries.
All the existing geometries must implement one of this three interfaces, depending of the geometry's kind. There're a detailed explanation of each one on the ISO19107's especification.
Primitive geometries
Primitive geometries must implement the Primitive interface. ISO19107 describes the primitives as a geometric object that couldn't be descomposed in another primitive on the system. Solid is a primitive too, beacuse the diferent sides of a solid haven't got sense by themselves.
The structure of primitives on gvSIG is shown in the next figure:
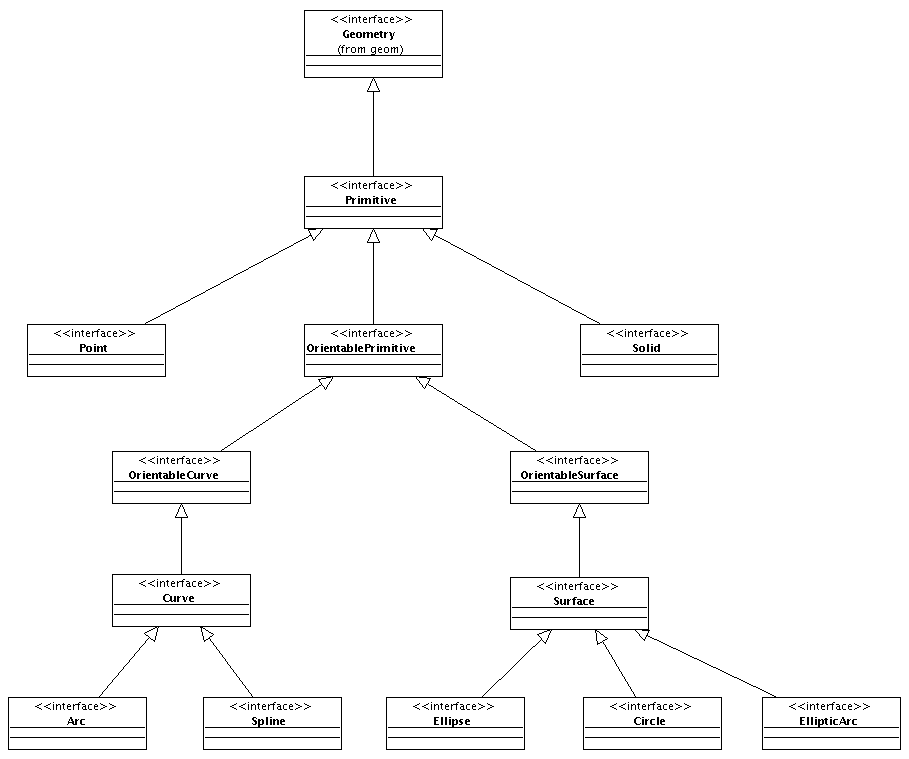
Here there's an important difference between ISO19107 and the model, because a Curve isn't composed by elements with smaller granularity than it, but is the own geometry which choose how to implement itself. In the Surface case is the same.
Complex geometries
In this moment gvSIG doesn't support complex geometries, for that, there isn't an analysis of this type of geometry.
Aggregate geometries
As ISO19107 describes, an aggregate geometry is a geometry composed by a primitive geometry collection. The geometries of this set could be different because, in theory, it can be added some new and delete some existing geometries.
In the next figure we show the aggregate geometry's diagram:
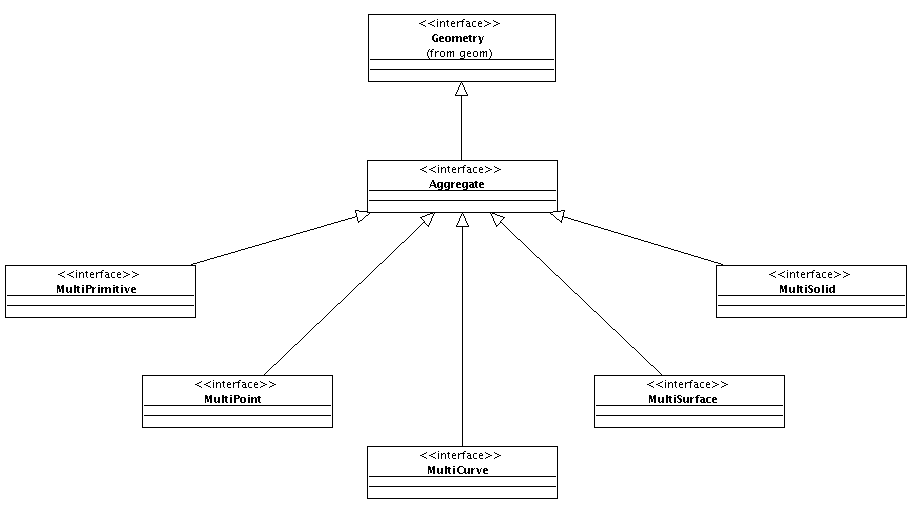
There're 5 sorts of aggregate geometries: MultiPrimitive is an aggregate geometry composed by primitives of any type, whereas the other types have primitive of a specific type. For that, a MultiPoint is an aggregate geometry built only by objects Point. A MultiCurve is an aggregate geometry composed only by objects Curve. And so on.
Geometry API access
Exists a serie of independent classes and interfaces that must be used to manage geometries. This classes are:
- GeometryLocator: It's the library locator. It provide us the location services of the GeometryManager used by the library.
- GeometryManager: It's the factory that provide us the access to the geometry API. From it we can register geometries, create some new, register operations... Is the access point to the object model.
- GeometryLibrary: Is the library where we must register the GeometryManager and where carry out all the register operations both geometry types and operations.
The application give us a default implementation of the GeometryManager that, in most of the cases, it wouldn't be necessary to modify. Moreover, it will exist a default implementation of the GeometryLibrary that will register the default manager and all the included geometries on gvSIG. From everywhere on the application, we could get an instance of the GeometryManager executing the following code:
GeometryManager geometryManager = GeometryLocator.getGeometryManager();
Create a new manager
First of all, before using a new manager on gvSIG, it's necessary to create it. For that, we must create a class that inherits from GeometryManager (in the example is called MyGeometryManager), and later we must register it executing the line:
GeometryLocator.registerGeometryManager (MyGeometryManager.class);
The explanation of the manager methods is on the JavaDoc. Besides, this document is an example of the using of this methods and it must resolve any doubt about any method.
The registration of the new manager must be done at the beginning of the application in a class that inherits from the GeometryLibrary- In the method Initialize we must do the registration, in the same way we do on the example, where we have created the class MyGeometryLibrary:
public class MyGeometryLibrary extends GeometryLibrary  {

  public void initialize() throws ReferenceNotRegisteredException {
    super.initialize();

    //Register the default GeometryManager
    GeometryLocator.registerGeometryManager(MyGeometryManager.class);
  }

  public void postInitialize() {
    super.postInitialize();
 }
}
When it's done, if we access to the locator from another part of the application to recuperate the instance of the GeometryManager, we will obtain an instance of the manager that we have registered.
Geometries
Concept of type and subtype
Before seeing how to create a new geometry is necessary to understand the type and subtype concept. Depending on the geometric characteristics, a geometry will be of one type or other. Some types defined on gvSIG are:
- Point: for geometries of point type.
- Curve: for geometries of line type.
- Surface: for geometries of polygon type.
- Arc: for geometries of arc type.
- etc.
All the types gvSIG supports currently are in TYPES in code form. If at any time somebody needs to create a new geometry that don't use any type on the list, he must contact with the gvSIG's team to assign a new code to the type, because it must be unique.
The type only refers to the type of the geomatic object, but it doesn't specify if geometry is on 2 or 3 dimensions, or if it supports M coordinate or not. For that, it's created the subtype concept, to indicate the geometry dimension. The gvSIG's subtypes are in SUBTYPES and it's the same than the types: if somebody wants to add a new subtype must contact with gvSIG's team to provide you a new code. In the next list we show several subtypes supported on gvSIG:
- GEOM2D: 2-dimensional geometries.
- GEOM2DZ: 2-dimensional geometries and value for coordenate Z.
- GEOM3D: 3-dimensional geometries.
- GEOM2DM: 2-dimensional geometries and M coordenate.
- GEOM3DM: 3-dimensional geometries and M coordenate.
Geometry type
All the geomtries in gvSIG must have a type. The geometry type is set by the GeometryType class, used for the next tasks:
- Determine the geometry type using one of the constants TYPES.
- Determine the geometry subtype using one of the constants SUBTYPES.
- Determine the associated opertions to one type of geometry (the operations will be explained in the following sections of this document).
The geometry types must be registrated at the beginning of the application to be used. When we create a geometry, we must indicate a type, and it will be accessible from the geometry interface Geometry.
Geometry register
All the geometries that you want to use in the application must have a type (GeometryType) previously registered. If we try to create a geometry with a non-registered type in the GeometryManager, we will get an exception of the kind CreateGeometryException.
To register a new geometry type, first of all we must obtain an instance of the GeometryManager and, later, we will register the implementation of the geometry type. To do this, we must know the geometry type and subtype. The diferent kinds of types are defined on TYPES, and the subtypes in SUBTYPES.
In the next example we show how to register a 2-dimensional point (is assumed that exists a Point2D class which inherits from Geometry).
geometryManager.registerGeometryType(Point2D.class, "Point2D", TYPES.POINT, SUBTYPES.GEOM2D);
The method registerGeometryType has 4 parameters. First of them is the class which contains the geometry implementation; the second one is the name to register and, the third and fourth, the geometry type and subtype.
In this case, is registering the default geometry for the type 2-dimensional point. When we invoke this method, the manager will associate to the specified type and subtype the implementation of the geometry that we have passed in first parameter, so that, when we create a geometry with that types, the manager will return an instance of the Point2D class.
The next example shows how to register a 3-dimensional point. The example assums that exists a Point3D class which inherits from Geometry and implements a 3-dimensional point:
geometryManager.registerGeometryType(Point3D.class, "Point3D", TYPES.POINT, SUBTYPES.GEOM3D);
In this other example, we register a geometry of the circle type. The example assums that exists a Circle2D class which inherits from Geometry and implements a 2-dimensional circle:
geometryManager.registerGeometryType (Circle2D.class, "Circle2D", TYPES.CIRCLE, SUBTYPES.GEOM2D);
Geometry creation
The GeometryManager has a method called create with two parameters (type and subtype) which is the generic method to create a new geometry. Using this method, you can create all the geometries previously registered. For example, to create a 2-dimensional point, you must execute the following code:
GeometryManager geometryManager = GeometryLocator.getGeometryManager();
Geometry point = geometryManager.create(TYPES.POINT, SUBTYPES.GEOM2D);
The geometry returned by this method is an empty geometry. To assign a value to the geometry coordinates we must do a casting to the geometry type that we are trying to create. Next, we can fix the coordinate values using the methods that are available in the geometry type. In the next example, we will create a 2-dimensional point in the 2,4 coordinates:
Point point = (Point) geometryManager.create(TYPES.POINT, SUBTYPES.GEOM2D);
point.setX(2);
point.setY(4);
In the next sections of this document, we will comment separately the different geometry types that exist in gvSIG and, for each one, we will show examples of their creation.
Geometry examples
Point
To create a geometry of the Point type, is necessary to use the code Point of the list on TYPES. We can use the generic method from the GeometryManager to create the geonometry, to do a casting to Point and to assign the values. For example, to create a 2-dimensional geometry with the coordinates 2,4 we need to execute the following code:
Point point = (Point) geometryManager.create(TYPES.POINT, SUBTYPES.GEOM2D);
point.setX(2);
point.setY(4);
There're directly methods both to write (setX and setY) and to read (getX and getY) the first and the second coordenate. To edit or recuperate the rest of values from the other dimensions you can use the generic methods setCoordinateAt and getCoordinateAt.
The manager has directly methods to create the most common geometries with the intent that we don't need to do a casting and the assignation of the values to the two first coordinates. In the Point case, we can use the method createPoint from the manager, where we must indicate the subtype of the point and the values of the first and second coordenate.
Point point = geometryManager.createPoint(2, 4, SUBTYPES.GEOM2D);
There aren't specific methods for all the kinds of geometries. For example, to create a 3-dimensional point which has the coordenates 1,1,5 we must execute the following code:
Point point = geometryManager.createPoint(1, 1, SUBTYPES.GEOM3D);
point.setCoordinateAt(2, 5);
Another option could be do it for each coordenate, and the result point will be the same:
Point point = (Point) geometryManager.create(TYPES.POINT, SUBTYPES.GEOM2D);
point.setX(1);
point.setY(1);
point.setCoordinateAt(2, 5);
Curve
To create a curve we can use the generic method create from the manager. To establish the coordenate's values we can use an object of the GeneralPathX type that is also available because the backward compatibility. The steps to create a polyline from the point 5,5 to the 10,10 are this:
Curve curve = (Curve)geometryManager.create(TYPES.CURVE, SUBTYPES.GEOM2D);
GeneralPathX generalPathX = new GeneralPathX();
generalPathX.moveTo(5, 5);
generalPathX.lineTo(10, 10);
curve.setGeneralPath(generalPathX);
A curve must be created from the own model's objects. In the curve case, they will be Point type objects. The following code let us to create a curve with the same coordentes like the previous example:
Point point1 = geometryManager.createPoint(5, 5, SUBTYPES.GEOM2D);
Point point2 = geometryManager.createPoint(10, 10, SUBTYPES.GEOM2D);
Curve curve = (Curve)geometryManager.create(TYPES.CURVE, SUBTYPES.GEOM2D);
curve.addVertex(point1);
curve.addVertex(point2);
The addVertex method inserts a new vertex in the last position in a Curve object and it should be used in the geometry creation. In the other hand, there're more methods which let us the edition of the curve's coordenates. For example, if we want to change the final point of the curve in the last example, we could do this:
Point endPoint = geometryManager.createPoint(15, 15, SUBTYPES.GEOM2D);
curve.setVertex(1, endPoint);
The setVertex method fixes the value of one of the internal points which are part of the curve composition and replace it for the point which was previously. In the other hand, we can also insert a point inside the curve. For example, to insert the point 7,7 in the second position we must execute the following code:
Point middlePoint = geometryManager.createPoint(7, 7, SUBTYPES.GEOM2D);
curve.insertVertex(1, middlePoint);
The first parameter is the point position that we want to put in. In this case, the resultant curve will have the coordinates 5,5 7,7 and 15,15 such as we have been defining.
Arc
An arc can be created from a central point which works like a radius and another two that will be used to determine the beginning and the end of the arc. In the next example, we will create an arc with the point 0,0 for the radius and from the point 1,0 to the 0,1:
Point centerPoint = geometryManager.createPoint(0, 0, SUBTYPES.GEOM2D);
Point startPoint = geometryManager.createPoint(1, 0, SUBTYPES.GEOM2D);
Point endPoint = geometryManager.createPoint(0, 1, SUBTYPES.GEOM2D);
Arc arc = (Arc)geometryManager.create(TYPES.ARC, SUBTYPES.GEOM2D);
arc.setPoints(centerPoint, startPoint, endPoint);
Moreover this way, an arc can be created from a initial point, a radius length and two angles. The next example creates an arc like the created in the previous example, with radius 1 and the beginning on 1,0 (0º) and finnish on 0,1 (90º):
Point centerPoint = geometryManager.createPoint(0, 0, SUBTYPES.GEOM2D);
Arc arc = (Arc)geometryManager.create(TYPES.ARC, SUBTYPES.GEOM2D);
arc.setPoints(centerPoint, 1, 0, 90);
Surface
To create a surface we can use the generic method create from the manager. To establish the coordinate's values, we can use a GeneralPathX type object. The steps to create a triangular polygon on the coordinates 0,0 0,5 5,5 can be the next:
Surface surface = (Surface)geometryManager.create(TYPES.SURFACE, SUBTYPES.GEOM2D);
GeneralPathX generalPathX = new GeneralPathX();
generalPathX.moveTo(0, 0);
generalPathX.lineTo(0, 5);
generalPathX.lineTo(5, 5);
surface.setGeneralPath(generalPathX);
Like it happens on the Curve, a Surface must be breated from the own model's objects. In the polygon case, they will be Point objects. The next code let us to create a polygon with the same coordinates like the previous example:
Point point1 = geometryManager.createPoint(0, 0, SUBTYPES.GEOM2D);
Point point2 = geometryManager.createPoint(0, 5, SUBTYPES.GEOM2D);
Point point3 = geometryManager.createPoint(5, 5, SUBTYPES.GEOM2D);
Surface surface = (Surface)geometryManager.create(TYPES.SURFACE, SUBTYPES.GEOM2D);
surface.addVertex(point1);
surface.addVertex(point2);
surface.addVertex(point3);
The addVertex method inserts a new vertex in the last position in a Surface object and it should be used in the geometry creation. In the other hand, there're more methods which let us the edition of the internal vertex's coordenates that compose the polygon. For example, if we want to change the final point of the polygon in the last example, we could do this:
Point endPoint = geometryManager.createPoint(0, 10, SUBTYPES.GEOM2D);
surface.setVertex(2, endPoint);
The setVertex method fixes the value of one of the internal points which are part of the polygon composition and replace it for the point which was previously. The first parameter is the internal point position that is necessary to modify.
In the other hand, we can also insert a point inside the polygon. For example, to insert the point 0,7 in the third position we must execute the following code:
Point middlePoint = geometryManager.createPoint(0, 7, SUBTYPES.GEOM2D);
surface.insertVertex(2, middlePoint);
The first parameter is the point position that we want to put in. In this case, the resultant polygon will have the coordinates 0,0 0,5 0,7 and 0,10 such as we have been defining.
Circle
The circles are represented on gvSIG with the Circle interface. To create a circle we can use the generic method create from the manager and, after that, establish the values of the center and radius. If we have a Point object (0,0 in this example) and we know the radius (5), we can create a circle with the following steps:
Point centerPoint = geometryManager.createPoint(0, 0, SUBTYPES.GEOM2D);
Circle circle = (Circle)geometryManager.create(TYPES.CIRCLE, SUBTYPES.GEOM2D);
circle.setPoints(centerPoint, 5);
Another option is to create a circle with a center and a point in the circle's circumference diameter. The next example let us to create a circle like the created in the first example:
Point centerPoint = geometryManager.createPoint(0, 0, SUBTYPES.GEOM2D);
Point radiousPoint = geometryManager.createPoint(0, 5, SUBTYPES.GEOM2D);
Circle circle = (Circle)geometryManager.create(TYPES.CIRCLE, SUBTYPES.GEOM2D);
circle.setPoints(centerPoint, radiousPoint);
The third option is to create a circumference with three points because there's only one which pass on them. To do that, we must create the three points and to invoke the setPoints method:
Point point1 = geometryManager.createPoint(0, 0, SUBTYPES.GEOM2D);
Point point2 = geometryManager.createPoint(5, 5, SUBTYPES.GEOM2D);
Point point3 = geometryManager.createPoint(7, 7, SUBTYPES.GEOM2D);
Circle circle = (Circle)geometryManager.create(TYPES.CIRCLE, SUBTYPES.GEOM2D);
circle.setPoints(point1, point2, point3);
Operations
Create operations
In gvSIG 2.0 is defined the operation concept. This is a class which inherits from GeometryOperation that implements a specific operation and associate it to a concrete GeometryType.
The GeometryOperation class needs two methods to be implemented: in one hand will be getOperationInxex, which returns the internal operation code. Operations must have a name but, in runtime, gvSIG will establish a correspondency between the names and codes of the operations. Following the convention, all the operations must have a public and static variable of the int type which will be intialized with the getGeometryOperationCode method from the GeometryManager. This method fixes the operation code value and it would be consulted to execute a concrete operation in a third class.
In the other hand, besides getOperationInxex, an operation will have a method called invoke which will be invoke when the operation is executed. The parameters are the geometry, in which we are going to do the operation, and the operation context (commented in the next sections).
In the next example we will create an operation called println which prints in the console the geometry that executes the operation:
public class PrintLn extends GeometryOperation {
  public static final String NAME = "println";
  public static final int CODE = GeometryLocator.getGeometryManager().getGeometryOperationCode(NAME);

  public int getOperationIndex() {
    return CODE;
  }

  public Object invoke(Geometry geom, GeometryOperationContext ctx) throws GeometryOperationException {
    System.out.println(geom.toString());
    return null;
  }
}
When we will have created an operation, we must register it in the application. The next section shows how to do it.
Register operations
If we want to use an operation, it must be registered previously. If we try to execute an operation and it isn't registered by the GeometryManager, we will get an exception.
The operation registration must be done in a class extended from the GeometryLibrary, in the postinitialize method. The registerGeometryOperation method takes care of the registration of an operation. The operations must be registered indicating the concrete geometry type (or several geometry types) which are associated with them. For that, can be operations that only are valid in a subset of geometries.
For example, the PrintLn operation commented in the previous section can be executed by all geometry types. To do it, is necessary to register it following this steps:
GeometryManager geometryManager = GeometryLocator.getGeometryManager();
geometryManager.registerOperation("PrintLn", printLn);
The registerOperation method accepts two parameters: the first one is the name of the operation and the second one is the object which implements the operation. In this case, we are registering the draw operation in the stardard output and it's associated to all geometries.
There's a mechanism to register operations associated with a concrete geometry types. We can create, for example, an operation PrintLn to write only 2-dimensional points. The operation will be the next:
public class printLnPoint2D extends GeometryOperation {
  public static final String NAME = "println";
  public static final int CODE = GeometryLocator.getGeometryManager().getGeometryOperationCode(NAME);

  public int getOperationIndex() {
    return CODE;
  }

  public Object invoke(Geometry geom, GeometryOperationContext ctx) throws GeometryOperationException {
    Point point = (Point)geom;
    System.out.println("Point 2D, X=" + point.getX() + " Y=" + point.getY());
    return null;
  }
}
This operation only works with objects of the type 2-dimensional point. For that, in the method registerOperation we must specify two new parameters: the type and subtype of the geometry which can use the operation. When the PrintLn operation is invoked, the code of the operation PrintLn will be executed for all the geometry types except to the 2-dimensional Point, which will execute the specific operation.
GeometryManager geometryManager = GeometryLocator.getGeometryManager();
geometryManager.registerOperation("PrintLn", printLnPoint2D, Geometry.TYPES.Point, Geometry.SUBTYPES.GEOM2D);
The registerOperation method is overwritted to let us to associate an operation to all the geometry of a concrete type (for all the subtypes). This example shows how to do an operation that prints points, independently of their dimensions.
public class printLnPoint extends GeometryOperation {
  public static final String NAME = "println";
  public static final int CODE = GeometryLocator.getGeometryManager().getGeometryOperationCode(NAME);

  public int getOperationIndex() {
    return CODE;
  }

  public Object invoke(Geometry geom, GeometryOperationContext ctx) throws GeometryOperationException {
    Point point = (Point)geom;
    System.out.println("Point, ");
    for (int i=0 ; i<point.getDimension() ; i++){
      System.out.println("Coordinate i =" + point.getCoordinateAt(i));
    }
    return null;
  }
}
To register this operation, we will execute this steps:
GeometryManager geometryManager = GeometryLocator.getGeometryManager();
geometryManager.registerOperation("PrintLn", printLnPoint, Geometry.TYPES.Point);
The last option is to register an operation for all the geometries of the same subtype. A clearly example of this operation is the 2-dimensional draw, which can be executed for all the 2-dimensional geometries. To register this operation we must execute:
geometryManager.registerOperationBySubtype("Draw2D", draw2D, Geometry.SUBTYPES.GEOM2D);
Operation invocation
We only can invoke an operation if it had been registered previously. When it's registered, we can execute the operation in a geometry only with the operation's name. For example, to execute the PrintLn operation we will execute the next code (is assumed that exists a 2-dimensional point called point registered and the operation was registered for this geometry type).
Object obj = point.invokeOperation("println", null);
The operations will return an object of the Object type with the result of the operation. In the invocation of the invokeOperation method appears a second parameter that is not used in the example. This argument is of the GeometryOperationContext type and it's a Map which contains all the input parameters for the operations.
In the next example we invoke an operation called intersects that is executed over two geometries. For that, is assumed that exists two Surface's in 2 dimensions called surface1 and surface2, previously created:
GeometryOperationContext geomertyOperationContext = new GeometryOperationContext();
geometryOperationContext.setAttribute("geom2", surface2);
Boolean results = (Boolean)surface1.invokeOperation("intersects", geomertyOperationContext);
To make this code run, is supposed that the intersects operation is executed in a "context" where exists a second geometry which is registered with the name "geom2". This, increase the difficulty to use it, because it will necessary to know all the names of the objects that are used to create the correct context.
To avoid this, you can create a specific context classes to execute a concrete operation. In the intersects case, we can create a class like this:
public class IntersectsGeometryOperationContext extends
              GeometryOperationContext {

  public IntersectsGeometryOperationContext(Geometry geom){
    this.setGeom(geom);
  }

  public Geometry getGeom() {
    return (Geometry)getAttribute("geom2");
  }

  public void setGeom(Geometry geom) {
    setAttribute("geom2", geom);
  }
}
Using this steps it isn't necessary to know the Map's name where the second geometry is stored. In the next example is going to execute the same code but this time is going to use the specific context for the operation:
IntersectsGeometryOperationContext intersectsContext = new GeometryOperationContext(surface2);
Boolean results = (Boolean)surface1.invokeOperation("intersects", intersectsContext);
It isn't necessary to use the Map provided by the GeometryOperationContext. For that, you can create class attributes to store the context parameters and make a personal implementation.
Another possibility to execute operations is using their code. The operations have by agreement a static variable of the integer type which contains the operation code. To execute the associated code to the intersecs operation we will run the following code (is assumed that exists a IntersectsOperation class):
IntersectsGeometryOperationContext intersectsContext = new GeometryOperationContext(surface2);
Boolean results = (Boolean)surface1.invokeOperation(Intersects.CODE, intersectsContext);
All this commented examples are used to execute an operation for a concrete geometry type. But it's interesting to bear in mind that we are passing the operation identificator by parameter to the geometry which will look for the operation to execute. In some cases, where there's a loop where are executed the same operation several times, the execution using this mechanism could be slow. For that, exists a way to do the operation access more efficiently.
The GeometryManager has a method called getGeometryOperation which returns an operation for a concrete geometry type and subtype. If, for example, we want to execute the intersects operation in a loop of 2-dimenasional Surface's (is assumed that we have all the surfaces in a variable of the type List<Surface> called surfaces) over a known surface (is also supposed that exists a variable of the type surface2) we can execute the next code:
GeometryOperation intersectsOperation = geometryManager.getGeometryOperation(Intersects.CODE, Geometry.TYPES.Point, Geometry.SUBTYPES.GEOM2D);
IntersectsGeometryOperationContext intersectsContext = new GeometryOperationContext(surface2);
for (int i=0 ; i<surfaces.size() ; i++){
  intersectsOperation.invoke(surfaces.get(i), intersectsContext);
}
Project Site (documentación generada con maven)
Documentación generada con maven: incluye JavaDoc, informes de test unitarios, validaciones de código, etc...


